The synchronizer hub and the sliding sleeve are the two toothed rings people mix up at the bench: the hub is the carrier fixed to the gearbox shaft, and the sleeve is the collar that slides along it to lock each gear in place. One is stationary with the shaft, the other moves on every shift, and each carries its own reference number when you order. Getting them straight decides whether your rebuild gets the right part or a second teardown.
This synchronizer hub vs sleeve comparison walks the whole decision: what each part does during a shift, how they differ side by side, which wear signs point at which part, what each one must match to fit, and whether to order a single part, the pair, or a full kit. Every component involved sits in the transmission parts range, so each check below maps onto a listing you can actually order from.
What the Hub and the Sleeve Each Do
Both parts sit at the center of one synchronizer, but they never swap jobs. The hub is the fixed half of the pair; the sleeve is the moving half. A gearbox study from Chalmers University of Technology describes the split plainly: the synchronizer hub is rigidly connected by a spline to the rotating shaft, while the sliding sleeve is only axially movable, riding on the hub's external splines.
| Item | Description |
|---|---|
| Synchronizer hub | The carrier of the synchronizer. It is splined onto the gearbox shaft and turns with it at all times, whether any gear is engaged or not. Its external splines carry the sleeve, and its machined slots hold the strut keys. |
| Sliding sleeve | The moving collar. It slides axially on the hub's external splines, carries the shift fork in its outer groove, and its internal teeth engage the clutching (dog) teeth on the side of the gear to complete the shift. |
During a shift, the fork pushes the sleeve toward the chosen gear while the synchronizer ring matches the speeds. Once the speeds agree, the sleeve slides through and its teeth lock the gear to the shaft — and from that moment the hub-to-sleeve spline connection carries the torque. Between the two parts sit the strut keys, usually three of them, which hold the sleeve centered in neutral and pre-load the ring as the shift begins. If the keys or their slots wear unevenly, the shift feel goes inconsistent long before anything visibly breaks.
Hub vs Sleeve: Side-by-Side Comparison
At the bench, two details tell the parts apart in seconds. The sleeve has a continuous groove around its outer diameter — that is where the shift fork rides. The hub has no fork groove; instead it shows its key slots on the face and its internal spline, the bore that mounts on the shaft. If the ring in your hand came off the shaft itself, it is the hub; if it came off around the hub and connects to the fork, it is the sleeve.
| Point of difference | Synchronizer hub | Sliding sleeve |
|---|---|---|
| Where it sits | Splined directly onto the gearbox shaft; fixed in position | Mounted on the hub's external splines; floats between the two gears it serves |
| How it moves | It does not move axially — it turns with the shaft at all times | Slides axially on the hub every time a gear is selected; a groove on its outer diameter takes the shift fork |
| What its teeth work with | Internal splines mate with the shaft; external splines carry the sleeve; slots carry the strut keys | Internal teeth ride the hub splines; end teeth engage the clutching (dog) teeth on the gear |
| What wears on it | Spline flanks under reversing torque loads, key slots, and the hub-side engagement interface | Internal teeth and sliding surfaces, end (engagement) teeth, detent recesses that hold it in gear |
| How it is identified when ordering | Its own reference number, matched to the gearbox model and gear position | Its own reference number, matched to the hub it slides on, the gear it engages and its length |
Neither part substitutes for the other. They are ordered under separate reference numbers because they are dimensioned for different jobs: the hub as the torque-carrying carrier, the sleeve as the moving engagement collar. A supplier asking for the gearbox model, the gear position and the number from the removed part is separating the two correctly; a listing that cannot say which of the two parts it sells is the one to walk away from.
Wear and Symptoms: Which Part Failed?
The symptom usually names the part before the gearbox comes apart. The pattern below comes from the way these assemblies actually fail. It also matches the fault tables OE service manuals publish — Eaton's synchromesh manual, for example, lists worn synchronizer assemblies (its words: springs, keys, sleeve or hub) under hard shifting, and lists whole-assembly wear and even swapped 1st/2nd and 3rd/4th hubs under a transmission that slips out of gear.
| What you notice | Where it usually points | Check to confirm |
|---|---|---|
| Jumps out of gear under load, or will not stay engaged | The engagement side — rounded dog teeth on the gear, rounded end teeth on the sleeve, or worn hub splines — or a hub fitted in the wrong position or orientation after a rebuild | Inspect the gear dog teeth, the sleeve end teeth and the hub spline flanks; verify the hub sits in its correct position and the right way around |
| Notchy or heavy shifts, vague detent feel, sleeve will not stay centered | The sleeve — worn internal teeth, worn sliding surfaces, or worn detent recesses and strut keys | Check the sleeve's internal teeth against the hub splines and the detent recesses against the keys |
| Grinds going into one specific gear | The synchronizer ring and its cone — the friction pair, not the hub or sleeve | Inspect the ring friction surface and thread grooves; the hub/sleeve may still be serviceable |
| Grinds into every gear, or hard to select any gear from a standstill | Outside the synchronizer — clutch not fully releasing, or the wrong gear oil | Check clutch adjustment and the oil specification before ordering gearbox parts |
The rebuild fault deserves its own warning: a gearbox that pops out of gear right after a rebuild is often not a worn part at all. An OE manual lists swapped 1st/2nd and 3rd/4th hubs as a cause of slip-out, and the assembly order matters the same way — the hub's orientation and the sleeve's chamfered side face a defined direction. Before blaming the parts, confirm the assembly went back together in the right positions.
- Hub external splines — look for rounded flank edges and lost clearance against the sleeve teeth
- Hub key slots — even spacing, clean edges, keys sitting square
- Hub orientation and position — the right hub, the right way around, in the right gear position
- Sleeve internal teeth — count them against the hub splines and check for wear steps
- Sleeve end (engagement) teeth — rounded tips mean it will not hold gear under load
- Detent recesses in the sleeve — worn recesses let the sleeve wander out of position
- Reference numbers from the removed parts — recorded before anything goes back in the box
Fitment: What Each Part Must Match
Fitment for these parts is interface math, not guesswork. The hub has two interfaces: its internal splines must match the shaft it mounts on, and its external splines must match the sleeve engagement teeth that ride on it. The sleeve has three: its internal teeth against the hub splines, its end teeth against the dog teeth on the gear, and its overall length, which sets how far it travels in each direction. Above both sits the same governing pair — the gearbox model and the gear position — because positions differ dimensionally inside one gearbox.
- Hub matches the shaft — internal spline count and fit agree with the gearbox model
- Hub matches the sleeve — external splines accept the sleeve the rebuild will use
- Sleeve matches the hub — internal tooth count checked against the hub splines
- Sleeve matches the gear — end teeth fit the dog teeth it must engage
- Sleeve length matches the original — measured from the removed part
- Gear position confirmed — the 1st/2nd position part is not the 3rd/4th part
- Gearbox model and assembly identification recorded with the order
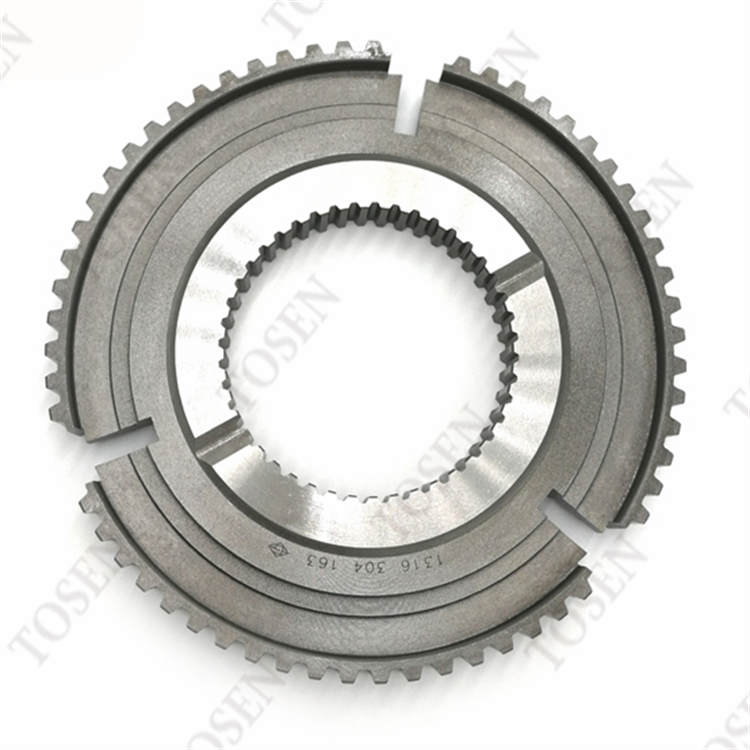
This is why a hub or sleeve order is always checked against its mating part, not just the gearbox model. A live example: the 1316304163 Synchronizer Hub for ZF Transmissions supplied through TOSEN is a 1st/2nd position component, and the product page defines its checks exactly this way — the hub splines against the shaft, the sleeve engagement teeth against the hub, and the adjoining synchronizer parts in agreement. On material, expect the hub's spline flanks to carry a hard case over a tougher core: the interface takes full torque in both drive and coast directions, so a part supplied without the specified surface treatment will not survive the reversing loads. Compare a received part against the removed one and the drawing before it goes into the build.
Buying Decision: One Part, the Pair, or a Kit?
Start with what the OE manuals say, because it is the honest baseline: for the transmissions it covers, Eaton's service manual instructs repairers not to replace a single synchronizer part — replace the whole assembly, and if a ring is needed, replace the ring set. The aftermarket works differently: hubs, sleeves and rings are supplied and rebuilt as single components every day, and that supply exists because teardowns often find one failed interface with the rest inside limits. Both positions are true at once, which is why the scope decision is conditional, not a preference.
The scope rule in one statement
Replace the part that failed, plus any mating interface that shows wear at teardown.
Order the hub-and-sleeve pair — or the full synchronizer kit — when both interfaces are worn, when the mating part's history is unknown, or when the parts cannot be verified against separate reference numbers.
Follow the OE whole-assembly position whenever the gearbox's own manual calls for it or the failure involved debris through the assembly.
- Gearbox model and assembly identification — the code, not just the truck model
- Gear position — 1st/2nd, 3rd/4th, or the position the synchronizer serves
- Reference number or component markings — from the removed part, both parts if you have them
- Dimensions and tooth counts — spline count, internal teeth, sleeve length
- Quantity — single rebuild or batch for stock
- Photographs of the mating components — the fastest way to resolve a mismatch question
Confirm fitment before you commit: take the checklist to your supplier, or request a quote on the 1316304163 synchronizer hub product page and the transmission parts category, where each enquiry is checked against the gearbox model, gear position and interface details.
Frequently Asked Questions
Is the synchronizer hub the same part as the sleeve?
No. The hub is the carrier splined to the gearbox shaft and it never moves axially; the sleeve is the collar that slides on the hub to engage each gear. They are sold under separate reference numbers and neither substitutes for the other.
Can I replace just the sleeve and keep my existing hub?
Yes, when the hub passes its own checks — splines within limits, key slots even, engagement interface clean — and the new sleeve matches the hub's splines, the gear's dog teeth and the original sleeve length. If the hub interfaces show wear too, order the pair.
Why does my gearbox jump out of gear right after a rebuild?
Check the assembly before blaming the parts. OE fault tables list worn synchronizer assemblies and hubs fitted in the wrong position or orientation — for example, 1st/2nd and 3rd/4th hubs swapped — as causes of a transmission slipping out of gear. Verify the hub position and orientation, then inspect the engagement teeth.
What are the three slots on the hub for?
They house the strut keys — the spring-loaded elements that hold the sleeve centered in neutral and pre-load the synchronizer ring as a shift begins. Synchronizers commonly use three keys spaced at 120 degrees; larger units use four at 90 degrees. Uneven slot spacing shows up as inconsistent shift feel.
How do I know a received hub is built to specification?
Compare it against the removed part and the drawing: spline tooth form and backlash, case-hardened flank surfaces, and evenly spaced, cleanly machined key slots. Ask the supplier which checks the part passed before shipping, and keep the reference number with the part through the build.
Do I need new rings when I replace the hub or sleeve?
Inspect them. The rings are the friction pair and wear independently of the hub-sleeve interface. OE guidance leans toward replacing ring sets rather than a single ring; if the teardown shows worn ring surfaces or the failure sent debris through the assembly, include the rings — or the full kit — in the order.
Order the Part the Wear Points At
The hub is the carrier and the sleeve is the mover; the fork groove and the shaft mount tell you which one is in your hand; the wear signs tell you which one to order — jump-out usually pointing at the engagement side where gear, sleeve and hub teeth meet, notchy shifts at the sleeve. The interfaces, the gear position and the reference number from the removed part then decide whether one part, the pair, or the full kit is the right scope.
Run the enquiry checklist — gearbox model, gear position, reference number, dimensions, quantity, photographs — then confirm fitment on the synchronizer hub product page or the transmission parts category before placing the order.